Authentication
Pixee Enterprise Server supports multiple authentication providers. This section covers configuration for all supported authentication methods.
Info
Support for OIDC compatible identity providers is in active development, contact support@pixee.ai to request additional support.
Embedded Identity Provider (Authentik)
Pixee Enterprise Server includes Authentik as an embedded identity provider. This provides a full-featured identity management solution without requiring an external OIDC provider.
Features
- User management with web-based admin interface
- Support for local users and passwords
- Federation with external identity providers (Google Workspace, Oracle, etc.)
- Self-service password change
- Session management
- Pixee-branded login experience
Email / SMTP Support
To enable email features such as self-service password reset, email verification, and notification emails, configure the SMTP / Email Settings section in the admin console. An SMTP server (e.g., your organization's mail relay, Gmail, SendGrid) is required. Without SMTP configured, password resets must be performed by an administrator through the Authentik admin interface or by using the recovery key command described below.
Configuration
To enable Authentik in Embedded Cluster deployments:
- Navigate to the admin console, select the
Configtab, then go to theBasic Settingssection - Under
Authentication mode, select "Authentik" - Save and deploy the configuration
After deployment, Authentik will automatically initialize with the Pixee OIDC application pre-configured. The default admin credentials are displayed in the config page.
To enable Authentik in Helm deployments, set the following in your values.yaml:
authentik:
  enabled: true
  authentik:
    secret_key: "<generate a secure random string - must not change after install>"
    bootstrap:
      password: "<initial admin password for akadmin user>"
    postgresql:
      host: "<postgresql-host>"
      name: "authentik"
      user: "authentik"
      password: "<database-password>"
    redis:
      host: "<redis-host>"
      port: 6379
  # Inject the OIDC client secret into the Authentik worker so the blueprint can
  # read it via !Env. References the same secret used by the platform.
  worker:
    env:
      - name: PIXEE_OIDC_CLIENT_SECRET
        valueFrom:
          secretKeyRef:
            name: oidc-client-secrets
            key: secret

global:
  pixee:
    access:
      enabled: true
      oidc:
        client:
          id: "pixee"
          secret: "<generate a secure random string>"
        redirectUri: "https://<your-domain>/api/auth/callback"
Initial Setup
After deploying with Authentik enabled:
-
Access the admin interface by navigating to:
https://<your-domain>/authentik/Log in with username
akadminand the password shown in the admin console config page (your license ID). After logging in, click the Admin interface button to access user management. -
Change the admin password (recommended) - Navigate to Directory > Users, select
akadmin, and update the password. This change will persist across upgrades. -
Create additional users as needed through the Authentik admin interface
-
Find the admin password in your
values.yamlunderauthentik.authentik.bootstrap_password -
Access the admin interface by navigating to:
https://<your-domain>/authentik/Log in with username
akadminand the configured password, then click the Admin interface button. -
Create additional users as needed through the Authentik admin interface
Recovery Access
If you need to reset a user's password, the easiest way is to create a recovery link from the Authentik admin UI:
- Navigate to Directory → Users and select the user
- Click Create Recovery Link — you can set how long the link stays valid (default: 30 minutes)
- Send the link to the user; they will be prompted to set a new password
As a CLI fallback, you can generate a recovery link via kubectl:
kubectl exec -n <namespace> deploy/<release-name>-authentik-server -- ak create_recovery_key 30 akadmin
This generates a recovery URL valid for 30 minutes.
Upgrades and Persistence
- User accounts, passwords, and settings are stored in the Authentik database and persist across upgrades
- Password changes made by users or admins will not be overwritten during upgrades
- The OIDC application configuration is managed declaratively and will be updated automatically during upgrades
Using Authentik behind a load balancer on a non-standard port
If your Pixee Enterprise Server is accessed through a load balancer on a non-standard port (e.g., port 5443), you must configure the reverse proxy settings for OIDC authentication to work correctly. See Reverse Proxy Settings — Non-Standard Port for setup instructions.
User Management
Users are managed through the Authentik admin interface at https://<your-domain>/authentik/if/admin/.
Creating Users
- In the admin interface, go to Directory → Users and click Create
- Fill in the user's details (username, display name, email) and click Create
- After creating the user, select them and click Create Recovery Link to generate a one-time password setup link — you can choose how long the link stays valid
- Send the recovery link to the user; they will be prompted to set their password on first visit
For more details, see the Authentik documentation on creating users and creating recovery links.
Editing and Deleting Users
- Go to Directory → Users, select a user, and update their details or deactivate their account
- Users created here can log in to Pixee Enterprise Server
Federating External Identity Providers
Authentik supports federating external identity providers so users can log in with their existing corporate credentials. After creating a source for your identity provider (see provider-specific sections below), you must add it to the login page.
Works behind a corporate egress proxy
Authentik honors the standard HTTP_PROXY / HTTPS_PROXY / NO_PROXY environment variables. When you configure an outbound HTTP proxy in the admin console, those values flow through to Authentik automatically, so back-channel calls to your identity provider (token exchange, userinfo, JWKS) route through the proxy. The no_proxy exclusion list is also honored if you need certain hosts to bypass the proxy.
Adding a Source to the Login Page
This step is the same for all federated identity providers. After creating a source in Authentik:
- In the Authentik admin interface, go to Flows and Stages → Flows
- Click on default-authentication-flow
- Go to the Stage Bindings tab
- Click Edit Stage on the default-authentication-identification stage
- Under Source settings, add your identity provider source to the Selected sources field
- Click Update to save
Users will now see the identity provider as a login option on the Authentik login page. Settings made on this stage (selected sources, user fields, recovery flow) are preserved across deploys — the Pixee Helm chart does not overwrite them. To redirect users directly to the identity provider instead of showing a selection page, see Auto-Redirect to Identity Provider. To show a self-service password recovery link, see Enable "Forgot Password?" Link on the Login Page.
Federated Users Are Made Internal Automatically
Authentik distinguishes internal users (full members who can reach the Application Dashboard and manage their own API tokens) from external users (redirected straight to their default application, with no dashboard access). Users enrolled through an external identity provider (IdP) are frequently created as external, which locks them out of the dashboard.
Pixee Enterprise Server handles this for you in two ways, with no configuration required:
- New users arrive internal at enrollment. Authentik's default source-enrollment flow otherwise creates users as external; the Pixee blueprint overrides that flow's User Write stage to create internal users instead.
- Existing users are converted by a deploy job that sweeps federated users (external and linked to a source) to internal. It is scoped to source-linked users, so local accounts (such as
akadmin) and service accounts are never touched.
Custom enrollment flows
The new-user override applies to the default source-enrollment flow, which is what OAuth and SAML sources use unless you change it. If you point a source at a custom enrollment flow, set that flow's User Write stage "User type" to Internal in the Authentik UI — the deploy job will also catch such users on the next deploy.
Disable Self-Service for Federated Users
When an external IdP owns your users' credentials and profiles, Authentik's self-service "Change password" and "Update details" controls no longer apply. You can hide them with a single toggle.
In the admin console, select the Config tab, enable "Disable Authentik self-service", then save and deploy.
Set the following in your values.yaml and upgrade:
authentik:
  disableSelfService: true
When enabled:
- the "Change password" card is hidden;
- the "Update details" form is hidden (the user-settings flow is removed from the brand).
These are applied declaratively, so turning the toggle off re-enables them (restores Authentik's defaults). Leave it off for local/embedded-user setups, where users manage their own accounts through these same controls.
Administrators and MFA
Administrators can still set or reset local-account passwords under Directory → Users, and the "Forgot password?" recovery flow still works. This toggle does not hide the MFA device cards: Authentik renders them whenever the authenticator setup stages exist, with no per-user setting to remove them. Whether federated users are challenged for local Authentik MFA depends on your source's authentication flow and any bound policies (it is not skipped automatically); their identity provider enforces its own MFA upstream regardless.
Optional: Customize Username Derivation
By default, Authentik populates each new federated user's username from the OIDC preferred_username claim — typically the full UPN (e.g. john.smith@example.com). To derive a shorter username from the email or UPN claim instead (e.g., john.smith from john.smith@example.com):
- In the Authentik admin interface, go to Customization → Property Mappings → Create → OAuth Source Property Mapping
-
Configure the mapping with one of the following, depending on your identity provider:
- Name:
Google Email to Username -
Expression:
return {"username": info.get("email", "").split("@")[0]}
- Name:
Entra UPN to Username -
Expression:
# Username derivation, in order of preference. Falls through to
# the enrollment-flow prompt if nothing is available.
upn = info.get("preferred_username") or info.get("email")
name = info.get("name", "").strip()
if upn:
    # "first.last@example.com" → "first.last"
    username = upn.split("@")[0]
elif name:
    # "First Last" → "first.last"
    username = name.lower().replace(" ", ".")
else:
    # Nothing usable in the token. The enrollment flow's prompt
    # stage will ask the user to type one.
    username = None

return {
    "username": username,
    "name": info.get("name", ""),
    "email": info.get("email", ""),
}
The fallback to
namehandles environments where Microsoft's userinfo response omitspreferred_usernameandemail— e.g., when the App Registration in Azure has not been granted (or admin-consented to) theemailandprofileAPI permissions, or when the user account itself has no primary email set. - Name:
-
Click Finish
- Go to Directory → Federation and Social login → edit the OAuth source for that identity provider
- Under User Property Mappings, add the mapping you just created to the Selected User Property Mappings field
- Click Update
New users will now be assigned a username automatically based on the identity provider's claim.
Troubleshooting Property Mappings
Most installs work without any custom mapping — Authentik's built-in extraction reads preferred_username, name, and email from any standard OIDC source and populates the user record automatically. The mapping above is only needed if you want a different username derivation (e.g. stripping the @<host> suffix).
If sign-in fails with "Aborting write to empty username" or new user records have empty fields:
-
Inspect what the IdP actually returned, by temporarily adding a debug log line to the property mapping's Python expression.
Open the Authentik admin UI at
https://<your-domain>/authentik/if/admin/and navigate to Customization → Property Mappings. Click on the mapping you want to debug — the edit panel opens on the right. The form has several fields; the one you want is the multi-line Expression text area, which contains the Python code that runs during sign-in.Before (the expression you already have, for example):
upn = info.get("preferred_username") or info.get("email")
return {"username": upn.split("@")[0] if upn else None}
After — add
ak_logger.warning(...)as the first line. The existing code stays underneath, untouched:ak_logger.warning("oauth source claims", info_keys=list(info.keys()), info=dict(info)) upn = info.get("preferred_username") or info.get("email") return {"username": upn.split("@")[0] if upn else None}Click Update to save. Then attempt a sign-in — the expression runs and writes a structured JSON log line to the
authentik-serverpod's stdout.About
ak_loggerak_loggeris a Python name pre-injected into every Authentik property-mapping expression (alongsideinfo,properties,request). It's not a CLI tool or a script file; it only exists inside the Expression text area when Authentik evaluates the mapping. See Authentik's Sources expression property mappings reference for the full list of available names and other example debug snippets.Read the resulting log line from the
authentik-serverpod:# From the Pixee Enterprise Server virtual machine sudo ./pixee shell kubectl logs -n kotsadm \ -l app.kubernetes.io/component=server,app.kubernetes.io/name=authentik \ --tail=200 | grep "oauth source claims"kubectl logs -n <namespace> \ -l app.kubernetes.io/component=server,app.kubernetes.io/name=authentik \ --tail=200 | grep "oauth source claims"Replace
<namespace>with the namespace you installed the chart into (oftendefault).The matching line is a JSON object. The first positional argument to
ak_logger.warning(...)lands in theeventfield, keyword arguments become top-level fields, and theloggerfield is set to the mapping's Name — useful for filtering to a specific mapping withgrep '"logger":"<your-mapping-name>"'. -
Interpret the
infodict and act on what's missing:Symptom in infoLikely cause Fix Only subandpicturepresentThe source isn't requesting OpenID Connect scopes, or the IdP isn't granting them On the Authentik source, expand Protocol settings and set Additional Scopes to email profile. For Entra/Azure App Registrations, also confirm under API permissions thatemail,openid,profileare added under Microsoft Graph → Delegated AND show "Granted for \<tenant>" in the Status columnnamepresent,preferred_username/emailmissingThe user account has no UPN/email on the IdP side, or emailpermission isn't admin-consentedEither grant the missing permissions on the IdP, or fall back to deriving the username from namein the mapping (see the Entra tab above)All claims present but mapping still fails Likely a Python error in the expression Look for Failed to execute property mappinglines in the same logRemove the debug line from the mapping expression once the issue is identified — it's noisy at sign-in volume.
Google OAuth
Pixee Enterprise Server supports Google as an identity provider using OAuth 2.0 / OpenID Connect. This works with any Google account (personal Gmail or Google Workspace).
Step 1: Create OAuth Credentials in Google Cloud Console
- Go to Google Cloud Console and select or create a project
- Go to APIs & Services → Credentials → Create Credentials → OAuth client ID
- If prompted, configure the OAuth consent screen first:
- User Type: Internal (for Google Workspace) or External (for any Google account)
- App name:
Pixee Enterprise Server - Authorized domains: add your domain (e.g.,
getpixee.com)
- Create the OAuth client ID:
- Application type: Web application
- Name:
Pixee Enterprise Server - Authorized redirect URIs:
https://<your-domain>/authentik/source/oauth/callback/google/
- Copy the Client ID and Client Secret
Step 2: Create an OAuth Source in Authentik
- In the Authentik admin interface, go to Directory → Federation and Social login → Create → Google OAuth Source
- Configure:
- Name:
Google(orGoogle Workspace) - Slug:
google - Consumer Key: your Client ID from Step 1
- Consumer Secret: your Client Secret from Step 1
- Name:
- Click Create
After creating the source, add it to the login page. Authentik will populate each user's username from the OIDC preferred_username claim automatically; to shorten it (or if sign-in prompts the user for a username), see Optional: Customize Username Derivation.
Microsoft Entra ID (OAuth)
Pixee Enterprise Server supports Microsoft Entra ID (formerly Azure AD) as a federated identity provider through Authentik using OAuth 2.0 / OpenID Connect. This is the recommended way to integrate Entra ID — see the deprecation notice on the Microsoft Entra Authentication section below.
The slug appears in both steps and must match
The slug at the end of the Redirect URI in Step 1 and the Slug of the Authentik source in Step 2 must be identical, or the callback after a successful Entra login will fail. The examples below use entra-id; you can choose any slug, but use the same value in both places.
Step 1: Retrieve App Registration Details
Follow the Authentik documentation for Microsoft Entra ID OAuth integration to create the App Registration in Microsoft Entra ID. When setting the Redirect URI, use:
https://<your-domain>/authentik/source/oauth/callback/entra-id/
The slug at the end (entra-id) must match the slug you assign to the source in Authentik in Step 2.
After creating the app registration, on the Overview page, save the Application (client) ID — you will use it as the Consumer Key in Authentik:
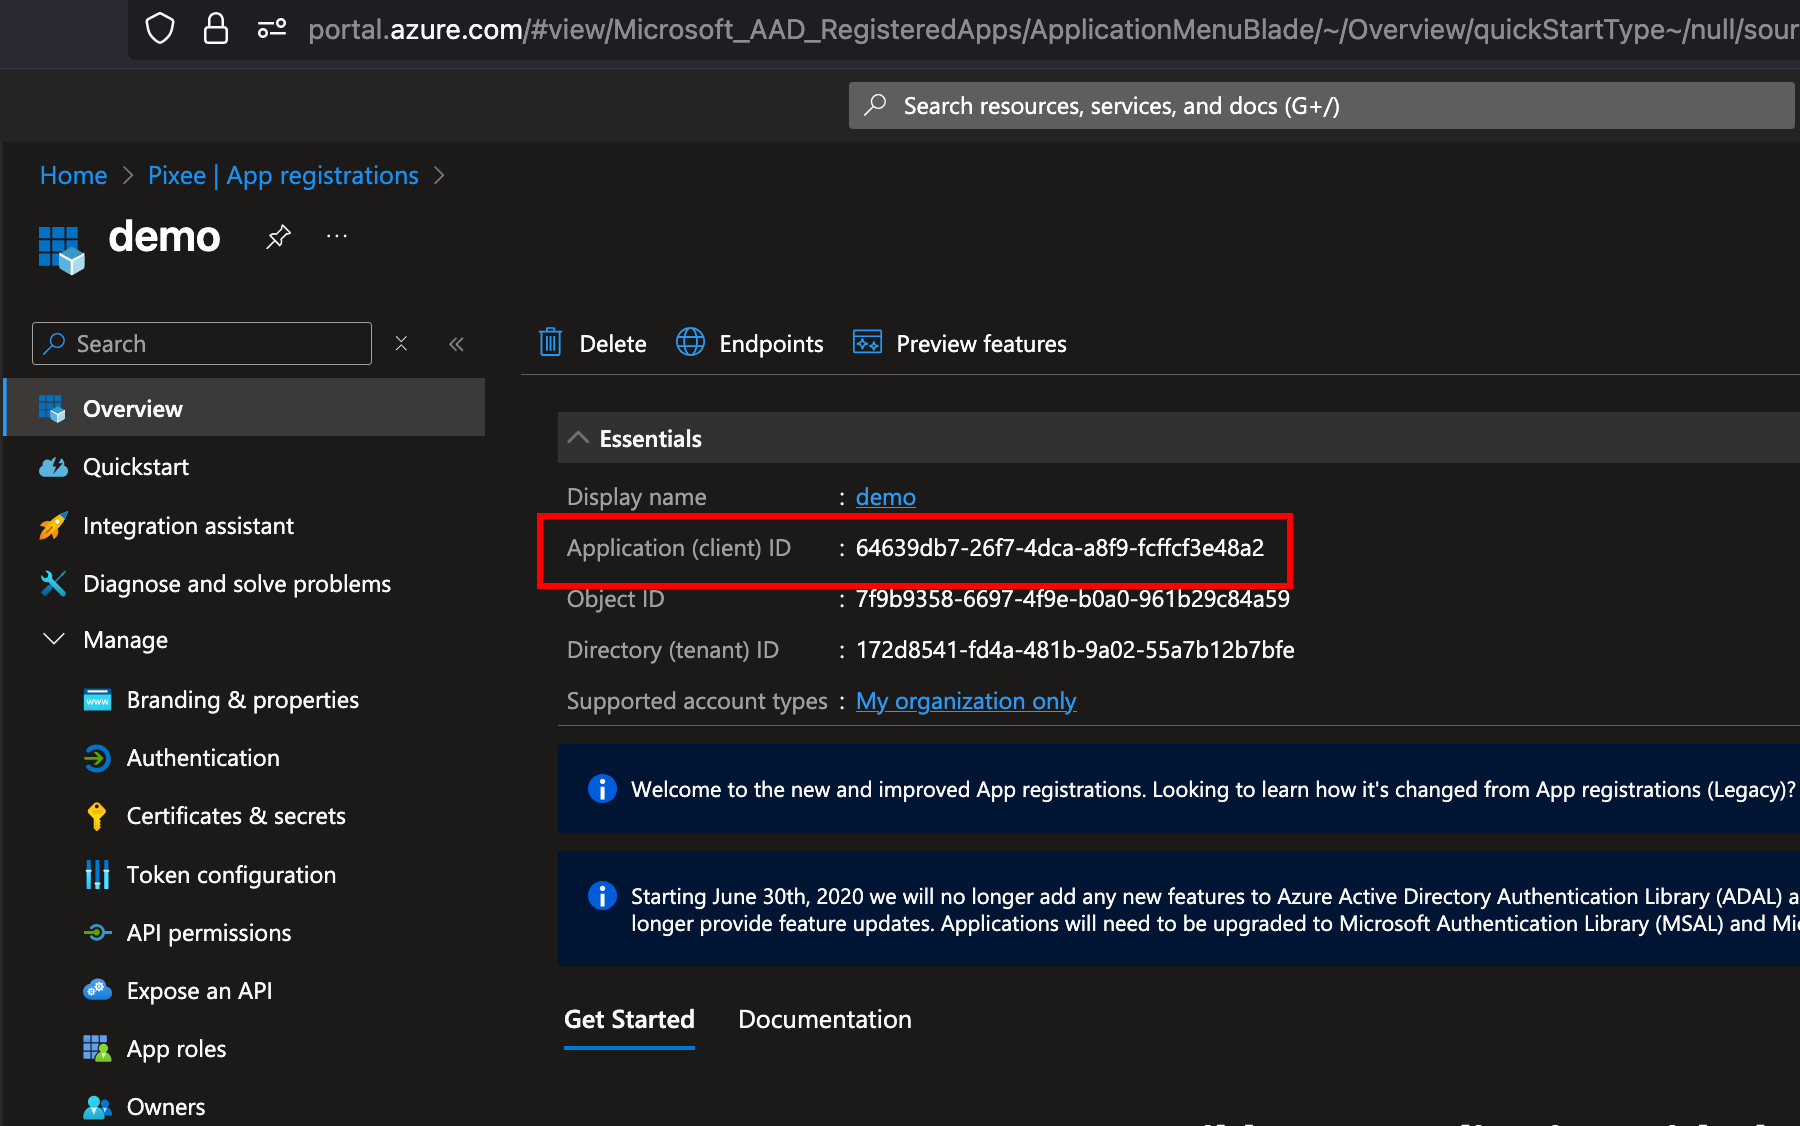
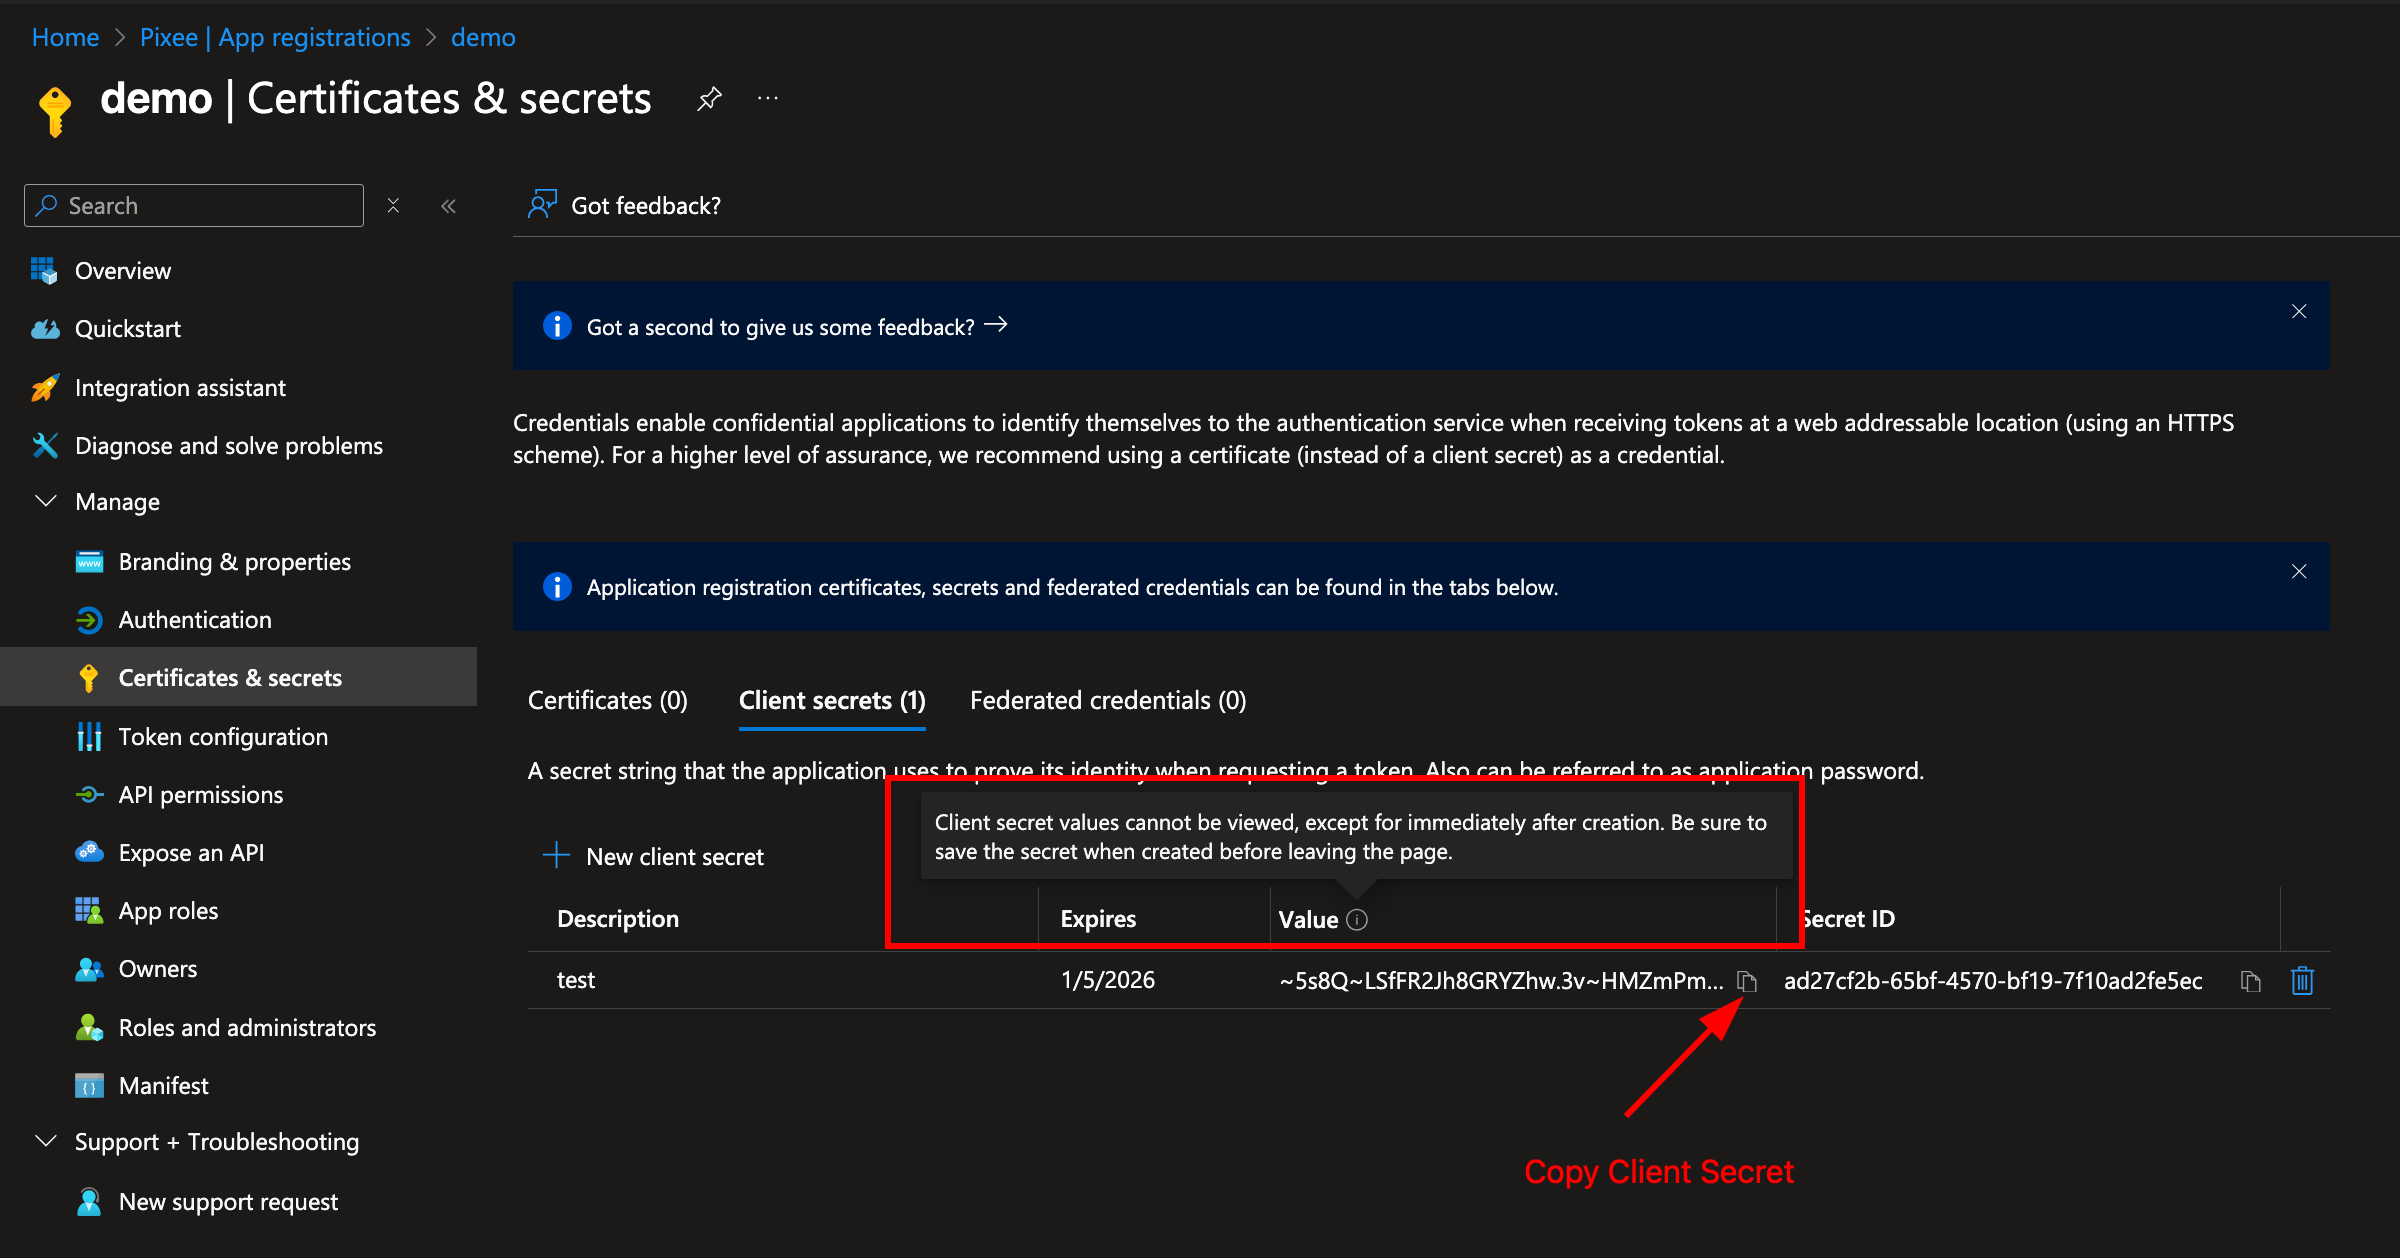
Navigate to Certificates & secrets in the left navigation bar and click New client secret:

Copy the secret Value immediately — it will not be shown again. This is used as the Consumer Secret in Authentik:
The OIDC endpoint URLs (authorization, token, JWKS) can be obtained from the Endpoints section of the App Registration:

Step 2: Create the Entra ID OAuth Source in Authentik
Follow the Authentik documentation for Microsoft Entra ID OAuth integration to create the source in Authentik, using the Application (client) ID and client secret value from Step 1.
Set the Slug to entra-id so the callback URL matches the redirect URI you registered in Step 1.
After creating the source, add it to the login page to enable it. Authentik will populate each user's username from Entra's preferred_username claim automatically; to shorten it (or if sign-in prompts the user for a username), see Optional: Customize Username Derivation. If sign-in fails or new user records arrive with empty email/name, see Troubleshooting Property Mappings.
Google Workspace (SAML)
Pixee Enterprise Server supports Google Workspace as an external identity provider using SAML.
Step 1: Create a SAML App in Google Workspace
- Go to Google Admin Console (
admin.google.com) → Apps → Web and mobile apps → Add app → Add custom SAML app - Enter a name (e.g.,
Pixee Enterprise Server) and click Continue - Copy the SSO URL and Certificate from Google — you will need these for the Authentik source configuration
-
Under Service Provider Details, set:
- ACS URL:
https://<your-domain>/authentik/source/saml/google/acs/ - Entity ID:
https://<your-domain>/authentik/source/saml/google/metadata - Name ID format:
EMAIL - Name ID:
Basic Information > Primary email
- ACS URL:
-
Check the Signed response checkbox
- Click Continue, then Finish
Enable the app for users
By default, new SAML apps in Google Workspace are OFF for everyone. You must turn it on:
- Click on the newly created app
- Click User access
- Set the service status to ON for everyone (or for the appropriate organizational units)
- Click Save
Step 2: Create a SAML Source in Authentik
Follow the Authentik documentation for Google Workspace SAML integration to create a SAML source using the SSO URL and Certificate from Step 1.
- In the Authentik admin interface, go to Directory → Federation and Social login → Create → SAML Source
- Set the Name (e.g.,
Google Workspace) and Slug (e.g.,google) - Set the Icon field to
/static/authentik/sources/google.svgso the Google logo appears on the login page - Set the SSO URL to the value copied from Google (e.g.,
https://accounts.google.com/o/saml2/idp?idpid=<your-idp-id>) - Set the Binding Type to Redirect (required for auto-redirect to work)
- Upload the Signing Certificate downloaded from Google
After creating the source, add it to the login page.
Troubleshooting
403 app_not_configured_for_user: This means either the Entity ID doesn't match or the app isn't enabled for the user. Verify that the Entity ID in Google Admin Console exactly matches the Authentik metadata URL (case-sensitive), and that the app is turned ON for the user's organizational unit.No Signature exists in the Response element: Enable the Signed response checkbox in the Google Admin Console SAML app under Service Provider Details.- "Permission denied" on login: Verify the Pixee application in Authentik is linked to the
pixeeprovider. Check Applications > Pixee Enterprise Server > Provider assignment.
Oracle Identity Domains (OAuth)
Pixee Enterprise Server supports Oracle Identity Domains as an external identity provider using OAuth/OIDC.
Step 1: Create a Confidential Application in Oracle
- Go to OCI Console > Identity & Security > Domains and select your domain
- Navigate to Integrated applications > Add application > Confidential Application
- Enter a name (e.g.,
Pixee Enterprise Server) and click Next - Under Client configuration, check "Configure this application as a client now"
- Set Allowed Grant Types to Authorization Code
-
Set Redirect URL to:
https://<your-domain>/authentik/source/oauth/callback/oracle/ -
Leave Token issuance policy set to All
- Click Finish, then Activate the application
- Copy the Client ID and Client Secret
Warning
Do not register Authentik as a Social Identity Provider in Oracle. Oracle should handle password authentication directly.
Step 2: Configure Authentik Federation
Follow the Authentik documentation for creating an OAuth Source using the OpenID Connect type.
When configuring the source, use the Client ID and Client Secret from Step 1. Your Oracle OIDC endpoint URLs follow this pattern (replace <your-idcs-instance> with your domain identifier):
- Authorization URL:
https://<your-idcs-instance>.identity.oraclecloud.com/oauth2/v1/authorize - Access token URL:
https://<your-idcs-instance>.identity.oraclecloud.com/oauth2/v1/token - Profile URL:
https://<your-idcs-instance>.identity.oraclecloud.com/oauth2/v1/userinfo
You can find these values in your Oracle OIDC discovery document at https://<your-idcs-instance>.identity.oraclecloud.com/.well-known/openid-configuration.
Note
All three endpoint URLs must be set explicitly on the source. Do not rely solely on the OIDC Well-known URL to auto-populate them.
After creating the source, add it to the login page.
Troubleshooting
- "Permission denied" on login: Verify the Pixee application in Authentik is linked to the
pixeeprovider. Check Applications > Pixee Enterprise Server > Provider assignment. - Redirect loop on Oracle login: Ensure the Authorization, Token, and Profile URLs are all explicitly set on the Oracle source. If any are blank, the redirect loops back to Authentik.
- Oracle shows Authentik login button: Remove any Social Identity Provider entries for Authentik from Oracle under Security > Identity providers.
LDAP
Pixee Enterprise Server supports LDAP directories as an authentication source through Authentik's LDAP federation. Users authenticate with their existing LDAP credentials — Authentik verifies passwords directly against the LDAP server and syncs user accounts automatically.
Prerequisites
Gather the following from your LDAP administrator:
- Server URL:
ldap://ldap.example.comorldaps://ldap.example.com(LDAPS recommended for production) - Bind DN: A service account DN for searching the directory (e.g.,
cn=svc-pixee,ou=service-accounts,dc=example,dc=com) - Bind Password: Password for the service account
- Base DN: Where to search for users (e.g.,
dc=example,dc=com) - User Object Filter: LDAP filter for user objects (e.g.,
(objectClass=person)) - Group Object Filter: LDAP filter for group objects (e.g.,
(objectClass=groupOfUniqueNames))
Network Access
The Pixee Enterprise Server cluster must be able to reach the LDAP server. The default ports are 389 (LDAP) and 636 (LDAPS), but non-standard ports are supported via the Server URI (e.g., ldap://ldap.example.com:3389). Verify network connectivity and firewall rules before configuring.
Step 1: Create an LDAP Source in Authentik
- In the Authentik admin interface, go to Directory → Federation and Social login → Create → LDAP Source
-
Configure the connection settings:
- Name: A descriptive name (e.g.,
Corporate LDAP) - Slug:
ldap(or a descriptive slug likecorporate-ldap) - Server URI: Your LDAP server URL (e.g.,
ldaps://ldap.example.com) - Bind CN: The service account DN
- Bind Password: The service account password
- Base DN: The search base for your directory (e.g.,
dc=example,dc=com)
- Name: A descriptive name (e.g.,
-
Configure the search settings:
- User Property Mappings: Select all the default LDAP property mappings (these map LDAP attributes to Authentik user fields)
- Group Property Mappings: Select the default LDAP group property mappings
- User object filter: LDAP filter for user objects (e.g.,
(objectClass=person)) — adjust for your directory - Group object filter: LDAP filter for group objects (e.g.,
(objectClass=groupOfUniqueNames)) — adjust for your directory - Group membership field:
member(oruniqueMemberdepending on your directory schema) - Object uniqueness field:
uid(adjust for your directory)
-
Under password settings, ensure the following are disabled:
- Update internal password on login: When enabled, Authentik stores a copy of the user's LDAP password internally. Disable this so that passwords are always verified directly against the LDAP server.
- User password writeback: When enabled, password changes in Authentik are written back to the LDAP server. Disable this unless you want users to change their LDAP password through Authentik.
-
Click Create
Step 2: Verify User Sync
After creating the LDAP source, trigger a sync and verify:
- Go to Directory → Federation and Social login, click on your LDAP source, and click Run sync
- Go to Directory → Users and verify that LDAP users have been imported
- Go to Directory → Groups and verify that LDAP groups have been imported
If users are not appearing after sync, check the sync logs:
- In the Authentik admin interface, go to Events → Logs
- Look for entries with action
configuration_error— these indicate sync failures with details about what went wrong -
Alternatively, check the Authentik worker pod logs directly:
kubectl logs -n <namespace> deploy/<release-name>-authentik-worker --tail=200 | grep -i "ldap\|configuration_error\|username"Common errors in the logs include:
- "Username was not set by propertymappings": Ensure a property mapping that sets the
usernamefield is selected on the LDAP source under User Property Mappings - "Could not find page in cache": The sync pagination timed out — try running the sync again, or increase the
ldap.task_timeout_hourssetting - "LDAPServerPoolExhaustedError": Authentik cannot connect to the LDAP server — check network connectivity and TLS settings
- "Username was not set by propertymappings": Ensure a property mapping that sets the
Sync Schedule
By default, Authentik syncs LDAP users and groups periodically (every 120 minutes). You can trigger a manual sync at any time from the LDAP source configuration page. Adjust the sync frequency in the LDAP source's Advanced settings if needed.
Step 3: Add LDAP to the Login Page
After creating the source, add it to the login page.
Once added, users will see an LDAP login option. When a user enters their LDAP credentials, Authentik authenticates them directly against the LDAP server.
How LDAP Authentication Works
When users log in via the LDAP source, Authentik performs a bind operation against the LDAP server using the user's credentials. With the recommended password settings above (both disabled), passwords are not stored in Authentik and are always verified directly against the LDAP server. If a user changes their LDAP password, the change takes effect immediately.
Troubleshooting
- "Connection refused" or timeout: Verify network connectivity from the cluster to the LDAP server. Check that the correct port (389 for LDAP, 636 for LDAPS) is open.
- "Invalid credentials" on bind: Verify the Bind DN and password.
- "Username was not set by propertymappings": Ensure a property mapping that sets the
usernamefield is selected on the LDAP source under User Property Mappings. - No users synced: Check the Base DN and user object filter. Use
ldapsearchto verify the filter returns results from outside the cluster. - Users synced but cannot log in: Ensure the LDAP source is added to the login page identification stage (see Adding a Source to the Login Page).
- "Permission denied" after LDAP login: Verify the Pixee application in Authentik is linked to the
pixeeprovider. Check Applications > Pixee Enterprise Server > Provider assignment. - TLS/certificate errors with LDAPS: If using a self-signed or internal CA certificate, you may need to add the CA certificate to the Authentik server's trust store.
Enable "Forgot Password?" Link on the Login Page
By default, the Authentik sign-in form does not show a "Forgot password?" link. Administrators can always trigger a password reset for any user from the Authentik admin console (Directory → Users → \<user> → Copy recovery link / Send recovery link via email) without any additional configuration — that path works out of the box.
To let end users self-service password recovery directly from the sign-in form, link the bundled pixee-recovery-flow to the identification stage:
- In the Authentik admin interface, go to Flows and Stages → Stages
- Edit default-authentication-identification
- Under Flow settings, set Recovery flow to Password Recovery (
pixee-recovery-flow) - Click Update to save
The "Forgot password?" link will now appear on the sign-in form. Clicking it walks the user through email-based password recovery.
SMTP required for email recovery
Self-service password recovery delivers a one-time-use reset link by email. Configure SMTP in the admin console (Config → SMTP / Email Settings) before enabling this link — otherwise users who click "Forgot password?" will hit a stage that cannot send mail. Administrator-triggered recovery via the admin console works regardless, but only the Send recovery link via email button needs SMTP; Copy recovery link always works.
Federated users
If users sign in through an external identity provider (Entra, Okta, etc.), they reset their password at the upstream provider — Authentik's password recovery only applies to local Authentik accounts (e.g. akadmin, breakglass accounts). For federated-only installs you can skip this step.
Auto-Redirect to Identity Provider
By default, when a federated identity provider is added as a source, users see the Authentik login page with both username/password fields and the identity provider button. To skip this page and redirect users directly to the identity provider, configure the identification stage to auto-redirect:
- In the Authentik admin interface, go to Flows and Stages → Stages
- Edit default-authentication-identification
- Under User fields, deselect all fields (remove Username, Email, etc.)
- Under Sources, ensure only the identity provider source is selected
- Ensure the Passwordless flow field is not set (empty/none) — auto-redirect only works when this is unset
- Click Update to save
With no user fields and exactly one source configured, Authentik automatically redirects users to the identity provider without showing the login page.
SAML Binding Type
For SAML sources, ensure the Binding Type on the source is set to Redirect rather than POST. With Redirect binding, Authentik performs a direct HTTP 302 to the identity provider. POST binding requires an intermediate page to submit the SAML request form.
Multiple Identity Providers
If more than one source is configured on the identification stage, auto-redirect is disabled and users will see a source selection page instead.
Direct Login for Administrators
When auto-redirect is enabled, administrators who need to log in with username/password (e.g., the akadmin account) can no longer use the default login page. The chart automatically provisions a dedicated direct-login flow for this purpose, so no manual setup is required.
Administrators can log in directly at:
https://<your-domain>/authentik/if/flow/direct-authentication-flow/
This flow presents a username/password form with no identity provider sources, so it bypasses the auto-redirect configured on the default flow. It reuses the built-in MFA validation and login stages.
Google Authentication
Pixee Enterprise Server supports Google authentication using OAuth 2.0.
Configuration
You must set up a new OAuth client and retrieve the client ID and client secret. See the Google Cloud Console documentation for more information on creating a new OAuth 2.0 Client ID.
To configure Google authentication in Embedded Cluster deployments follow:
Navigate to the admin console, select the Config tab, then go to the Basic Settings section.
Under Authentication mode, select Google as the provider and provide a client ID and client secret.
To configure Google authentication in Helm Deployment follow:
To enable Google authentication, set the following in your values.yaml:
global:
  pixee:
    access:
      oidc:
        client:
          provider: google
          id: '<your Google oidc client id>'
          secret: '<your Google oidc client secret>'
Microsoft Entra Authentication
Deprecated — use Authentik federation instead
Direct Microsoft Entra authentication is deprecated and will be removed in a future release. New deployments should use the embedded Authentik identity provider with Entra ID federation — see Microsoft Entra ID (OAuth) under Federating External Identity Providers. Existing deployments using direct Entra authentication should plan to migrate.
Outbound HTTP proxy not supported in this mode. The platform's OIDC client (Quarkus / Vert.x) does not honor either JVM proxy properties or the no_proxy exclusion list when reaching Microsoft Entra. If your environment requires a corporate egress proxy, OIDC discovery and token exchange will fail. The Authentik-federated path (linked above) is built on Python requests and respects HTTP_PROXY / HTTPS_PROXY / NO_PROXY natively, so it works behind a corporate proxy with the standard proxy settings.
Pixee Enterprise Server supports Microsoft Entra authentication with single tenant applications.
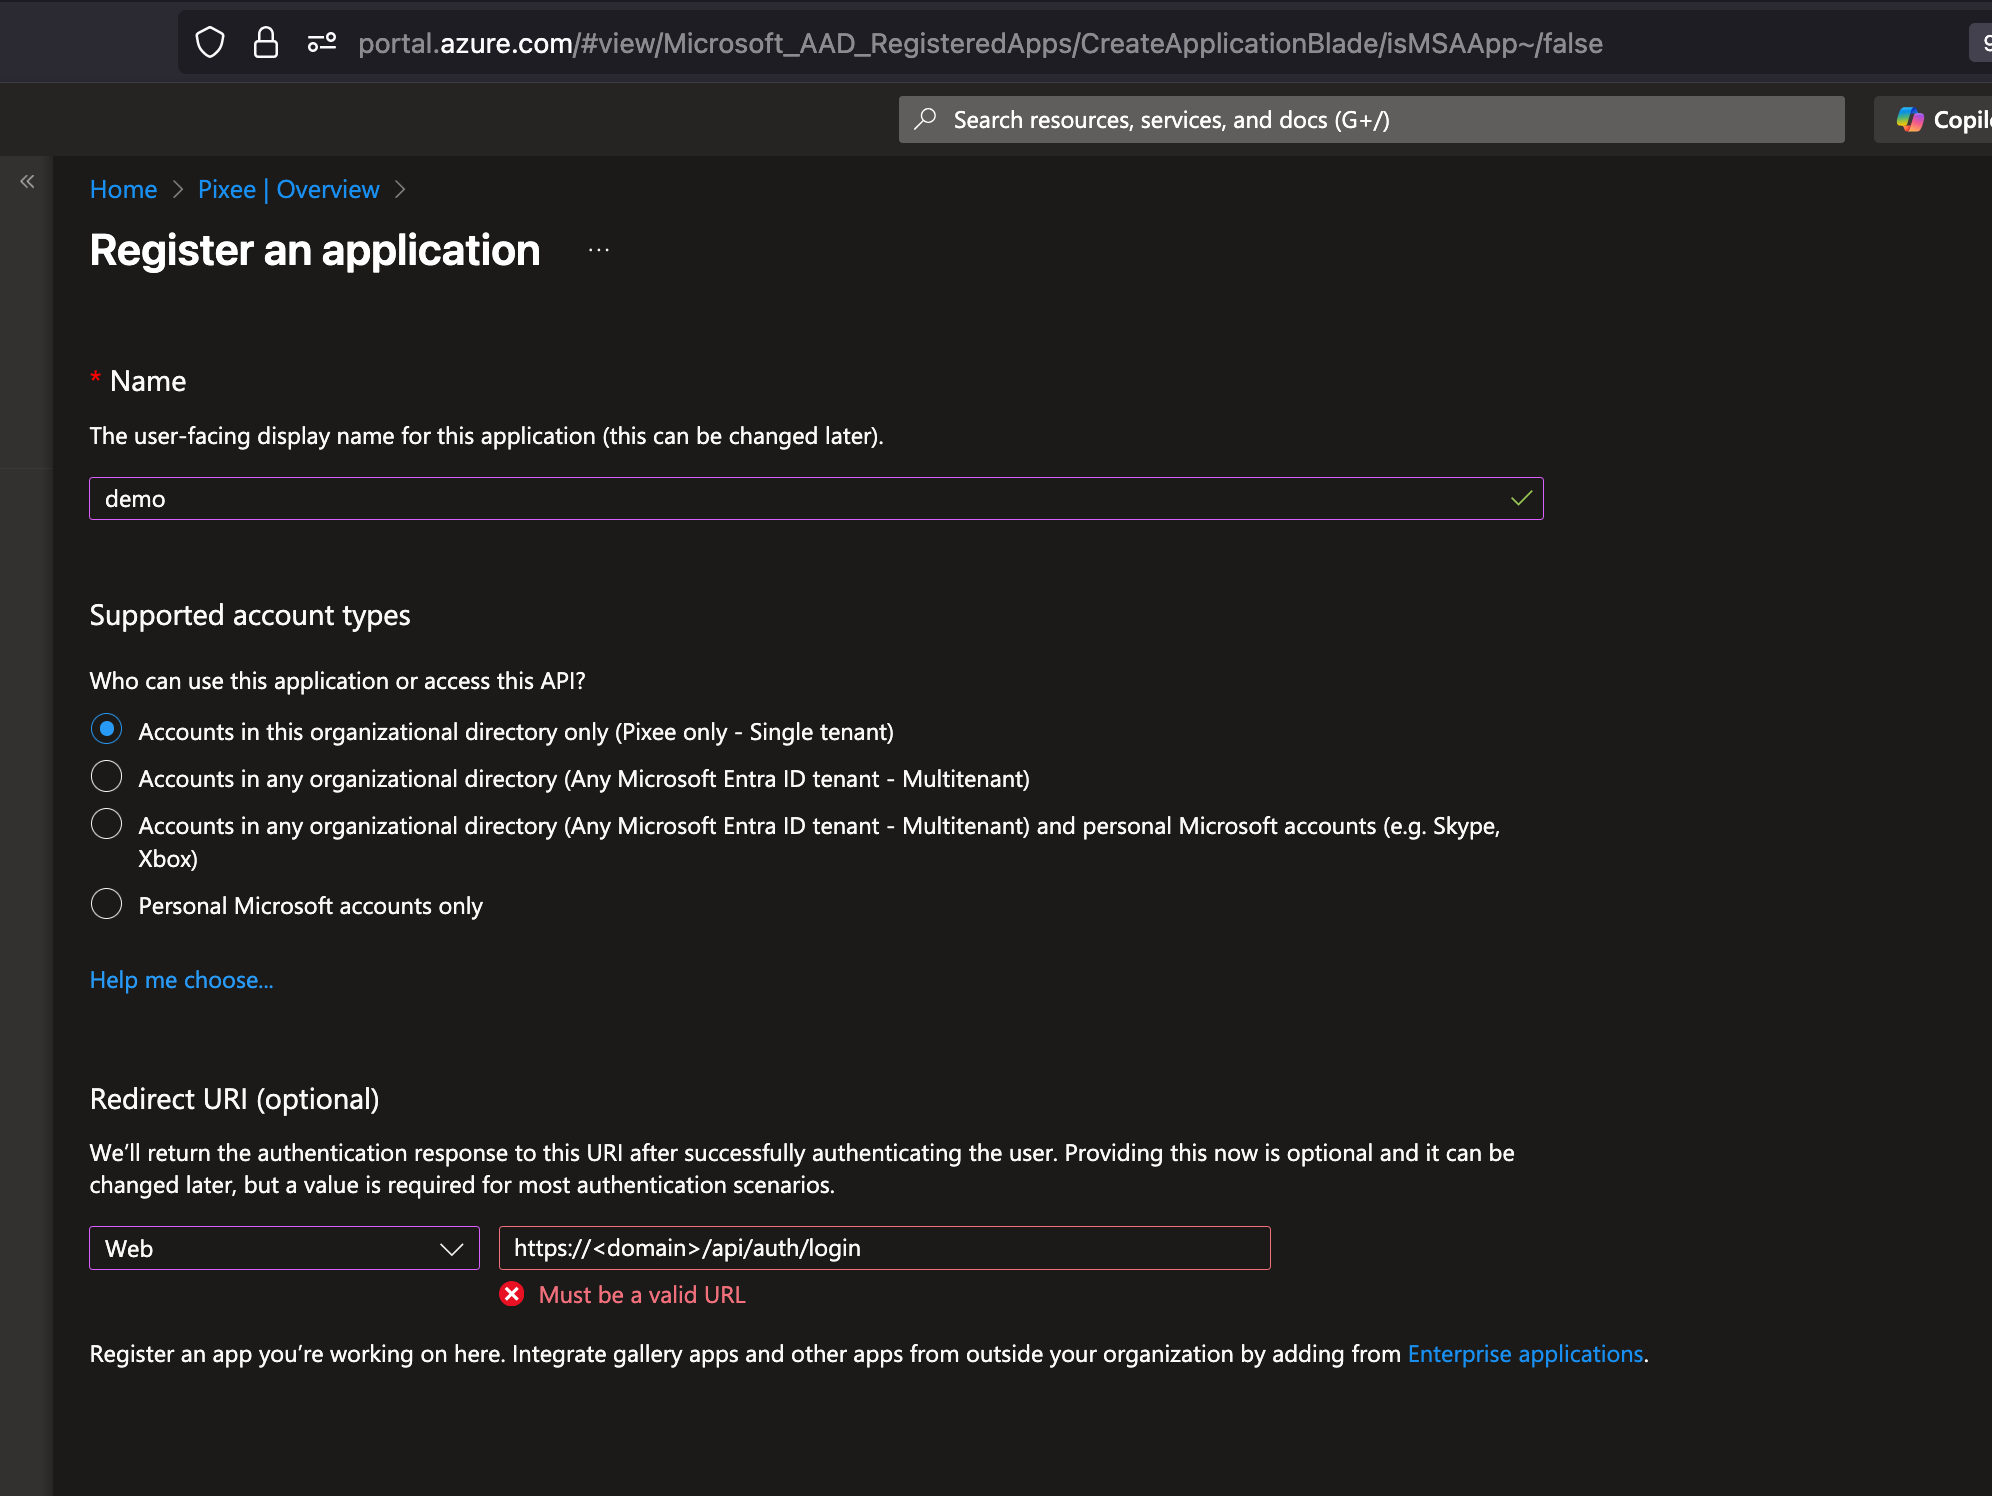
Create an App Registration
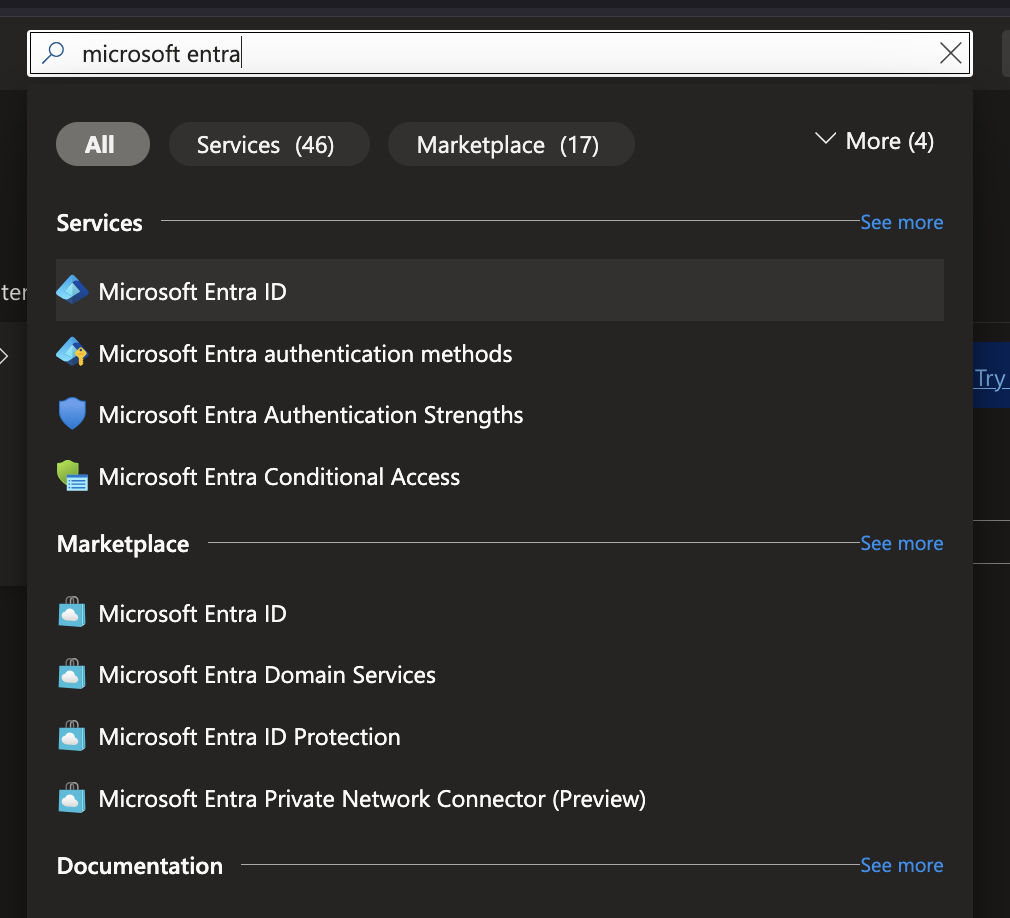
In order to set up OIDC for Microsoft you need to go to your Microsoft Azure Portal,
and search for Microsoft Entra ID. Select Microsoft Entra ID under Services.
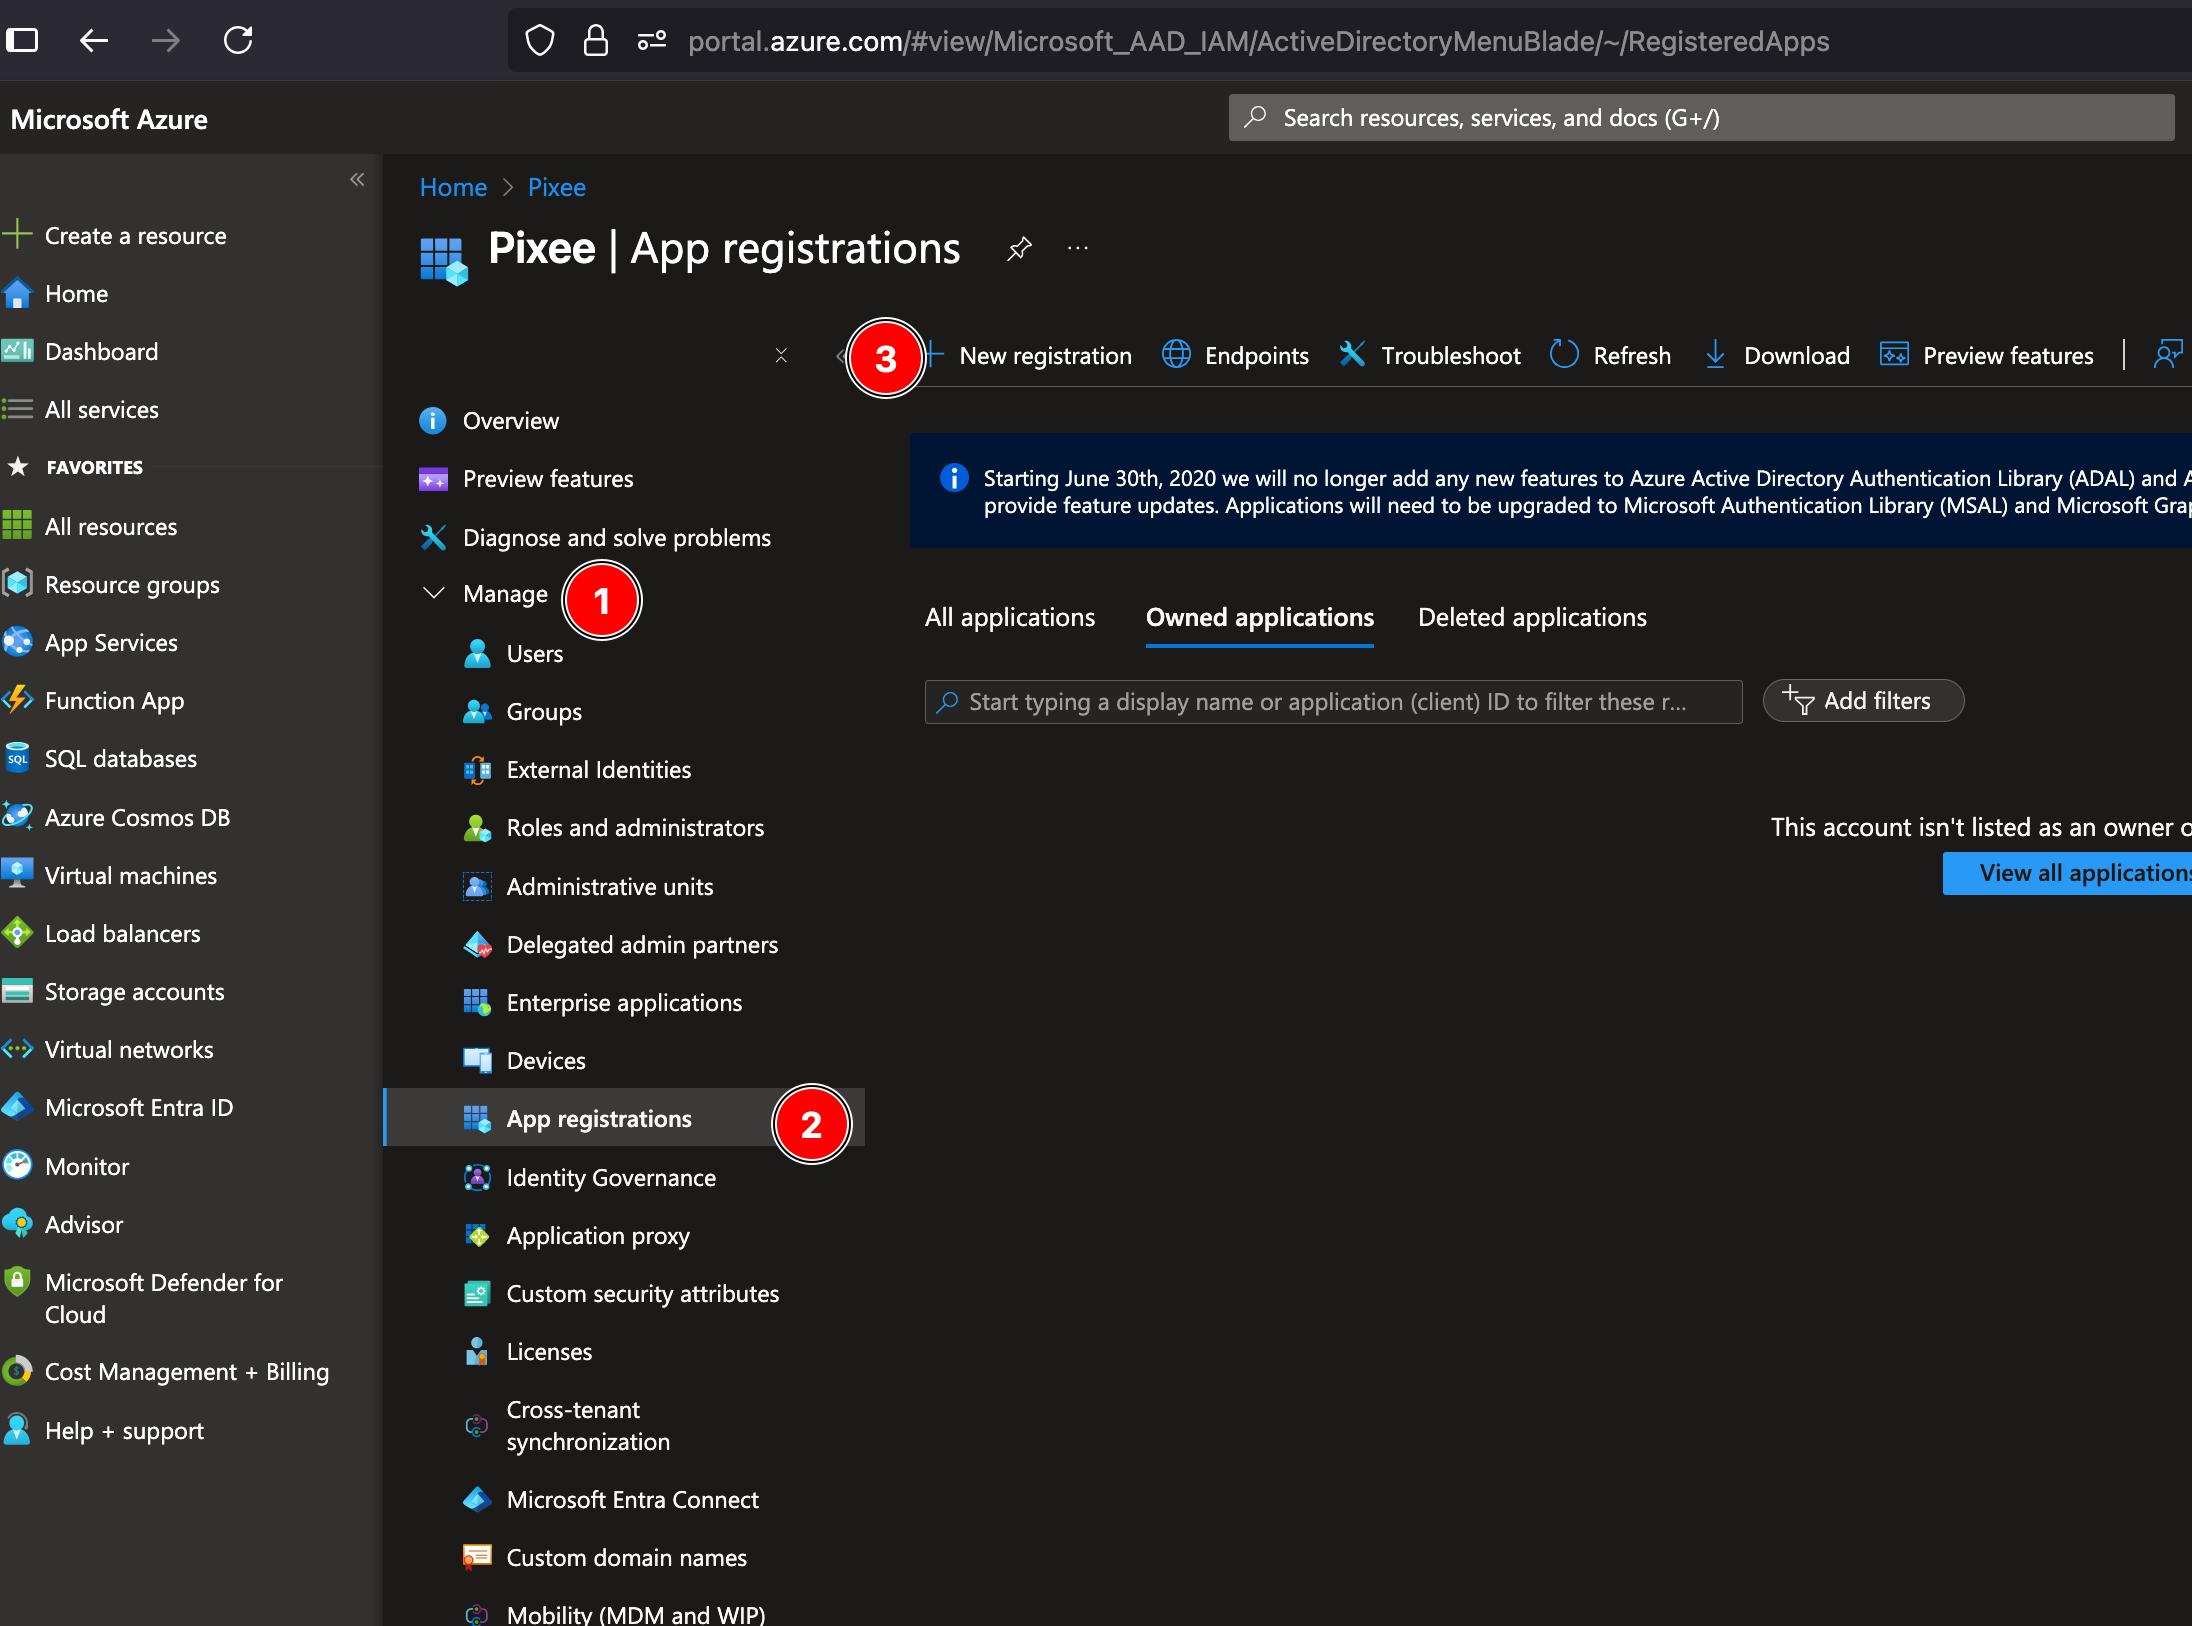
Look for Manage on the left navigation bar, click on App registrations then click on New registration:
Fill in your application name, select the Single tenant option and add a Web Redirect URI as https://<domain>/api/auth/login, then click on Register:
Retrieve App Registration Details
After creating the app registration, you will be redirected to the app's overview page. On this page you will find:
- Application (client) ID: Save this ID, which you will use as the
ClientIDin your Pixee configuration.
Then navigate to Certificates & secrets in the left navigation bar, and click on New client secret to create a new secret:
Client Secret: After creating the client secret, copy the value immediately as it will not be shown again. This value will be used as the ClientSecret in your Pixee configuration:
Authority URL: can be obtained from the "Endpoints" section of the App Registration:
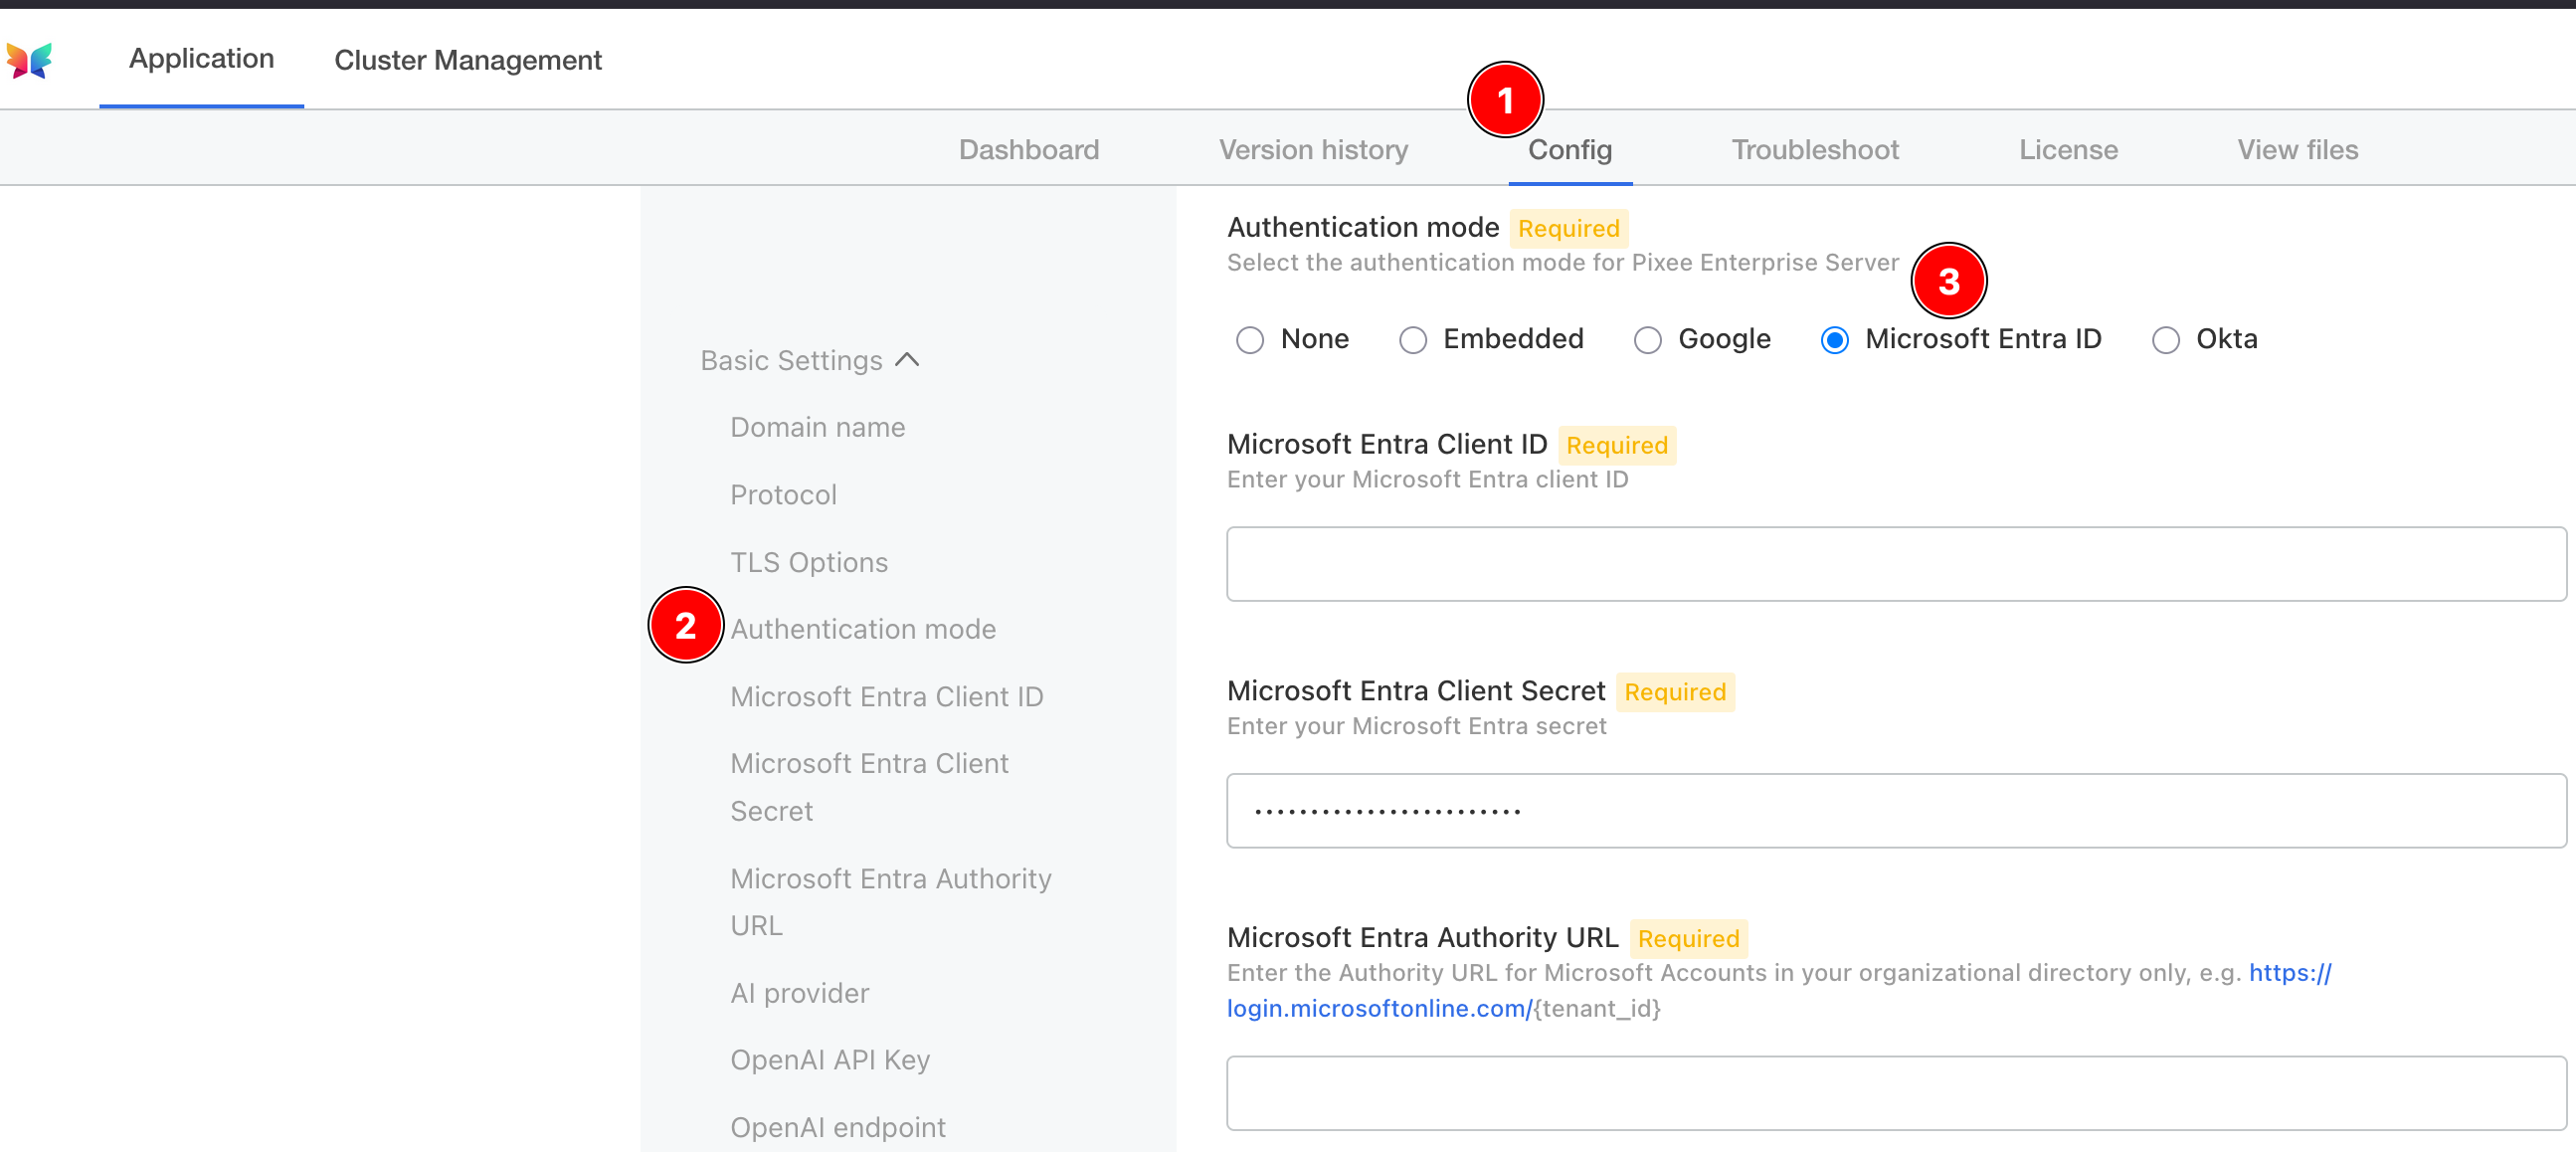
To configure Microsoft Entra authentication in Embedded Cluster deployments follow:
Navigate to the admin console, select the Config tab, then go to the Basic Settings section.
Under Authentication mode, select Microsoft Entra as the provider and provide a client ID, client secret, and authority URL.
To configure Microsoft Entra authentication in Helm Deployment follow:
To enable Microsoft authentication, set the following in your values.yaml:
global:
  pixee:
    access:
      oidc:
        client:
          provider: microsoft
          id: '<your Microsoft oidc client id>'
          secret: '<your Microsoft oidc client secret>'
          authServerUrl: '<your Microsoft oidc auth server url, such as https://login.microsoftonline.com/{tenant_id}>'
Okta Authentication
Pixee Enterprise Server supports Okta OIDC authentication.
Configuration
You must create a new OIDC App Integration from the Okta Admin Console and retrieve the client ID, client secret, and Okta URL:
- Log in to the Okta Admin Console as an administrator.
- Navigate to Applications > Applications > Add App Integration.
- Select OIDC - OpenID Connect, set Application Type to Web Application, and then click Next.
- Configure the following required settings:
- App Integration Name: pixee
- Sign-in redirect URIs: https://< domain >/api/auth/login
- Under Assignments, select how you'd like to control access to Pixee. Allow everyone in your organization to access or select a group to limit access.
- Click Save.
- Under Client Credentials, take note of the Client ID. This value will be required in the Pixee Admin Console.
- Under CLIENT SECRETS, click the Copy to clipboard next to the secret and take note of the value, it will also be required in the Pixee Admin Console.
The Okta URL is of the form https://{tenant-name}.okta.com. You can verify this is correct by viewing the well-known OpenID Connect configuration at https://{tenant-name}.okta.com/.well-known/openid-configuration.
To configure Okta authentication in Embedded Cluster deployments follow:
Navigate to the admin console, select the Config tab, then go to the Basic Settings section.
Under Authentication mode, select Okta as the provider and provide a client ID, client secret, and Okta URL.
To configure Okta authentication in Helm Deployment follow:
To enable Okta authentication, set the following in your values.yaml:
global:
  pixee:
    access:
      oidc:
        client:
          provider: okta
          id: '<your Okta oidc client id>'
          secret: '<your Okta oidc client secret>'
          authServerUrl: '<your Okta oidc auth server url, such as https://{tenant-name}.okta.com>'